Creating a real time graph using SignalR


SignalR is a ASP.NET Core library that can be used to develop real time web applications.
What are real time web applications?
Real time web applications differ significantly from traditional web applications. Traditional web applications pull data from the server by making HTTP requests. In real time web applications the server and client are connected continuously and data flows in this connection without the need for establishing and terminating a connection for every request.
Let’s create a simple web application where multiple users can add data points to a graph in real time. We will be using ASP.NET Core 2.1 for this project, the completed project will look like this
Setting up the project
dotnet new web -o SignalR_LiveGraph
This dotnet CLI command creates an empty ASP.NET Core web project in the folder SignalR_LiveGraph
Then we need to build the project once, so that the project dependencies will be downloaded.
cd SignalR_LiveGraph
dotnet build
If the build isn’t successful, there must be something wrong with your .NET Core installation
We are done with the setup, let’s dive into the actual code
First we should start by adding SignalR to our web application
public void ConfigureServices(IServiceCollection services)
{
  services.AddSignalR();
}
The AddSignalR() method adds the necessary stuff required for SignalR to run properly.
Then in the Configure method,
public void Configure(IApplicationBuilder app, IHostingEnvironment env)
{
  if (env.IsDevelopment())
  {
    app.UseDeveloperExceptionPage();

  }
  app.UseFileServer(); // <--- Add this
}
Nothing big here, we just removed app.Run() which returns "Hello World!" as the response for every request and added app.UseFileServer() which enables the static file middleware, so that we can use a serve a index.html, and other static files.
Creating a SignalR Hub
A Hub enables us to call methods on connected clients from the server, Don’t worry if this doesn’t make sense to you, it will make sense once you see it in action.
using Microsoft.AspNetCore.SignalR;
using System.Threading.Tasks;
namespace SignalR_LiveGraph
{
  public class GraphHub : Hub
  {
    public Task SendValue(int value)
    {
      return Clients.All.SendAsync("ReceiveValue", value);
    }
  }
}
We have created a class GraphHub that extends SignalR.Hub and added a method that we will be calling from the client. Clients contains all the clients that are connected, we have used Clients.All since we want to broadcast the value to all the connected clients.
Now we have to map the hub to a path, to do that we have to add the following to the Configure method in Startup.cs
app.UseSignalR(routes => { routes.MapHub("/graphHub"); });
We have mapped the path /graphHub to the GraphHub class. We are done with the signalR server, now we need to create the client.
Create index.html under wwwroot and add the following scripts and stylesheets
<!DOCTYPE html>
<html>
    <head>
        <meta charset="utf-8" />
        <meta http-equiv="X-UA-Compatible" content="IE=edge">
        <title>SignalR Real time graph</title>
        <meta name="viewport" content="width=device-width, initial-scale=1">

        <link rel="stylesheet" href="//cdn.jsdelivr.net/chartist.js/latest/chartist.min.css">
        <script src="//cdn.jsdelivr.net/chartist.js/latest/chartist.min.js"></script>
        <script src="https://code.jquery.com/jquery-3.3.1.min.js" integrity="sha256-FgpCb/KJQlLNfOu91ta32o/NMZxltwRo8QtmkMRdAu8=" crossorigin="anonymous"></script>
        <script src="https://cdn.jsdelivr.net/npm/@aspnet/signalr@1.0.0/dist/browser/signalr.min.js"></script>
    </head>
    <body>
        <div>
            <label> Enter a value </label>
            <input type="text" id="datapoint">
            <button id="submitBtn">Add</button>
            <button id="randomValueBtn">Add Random</button>
        </div>
        <div id="chartArea">
        </div>
    </body>
    <script>
        // create the Chartist object
        var lineChart = new Chartist.Line('#chartArea', {
            labels: [],
            series: [[]]
        },
        {
            low: 0,
            showArea: true
        });
        // build a signalR HubConnection
        var connection = new signalR.HubConnectionBuilder().withUrl("/graphHub").build();
        // define behavior when the "ReceiveValue" event is sent from the server
        connection.on("ReceiveValue", (value) => {
            lineChart.data.series[0].push(value);
            lineChart.update();
        });
        connection.start();
        // Send the value to SendValue method in GraphHub.cs
        var sendValue = async function(value) {
            await connection.invoke("SendValue", value);
        };
        // Send the user entered value to GraphHub.SendValue
        $("#submitBtn").on("click", () => {
            const value = $("#datapoint").val();
            if (value && !isNaN(value)) {
                sendValue(value);
                $("#datapoint").val("");
            }
        });
        // Send a random number to GraphHub.SendValue
        $("#randomValueBtn").on("click", () => {
            const value = Math.floor((Math.random() * 1000) % 100);
            sendValue(value);
        });
    </script>
</html>
We will be having a textbox for the user to enter a value, a button to submit, a button for providing random values and a line chart to display those values
Now, let’s test it
dotnet build
dotnet run
What is the difference between WebSockets and SignalR?
WebSocket is a technology which is used for data transfer, SignalR is a library for ASP.NET developers. SignalR uses WebSockets if it is supported by the browser, else it will fallback to other methods that simulate a persistent connection such as long polling, Server Sent Events, Forever frame, etc.
How to debug SignalR applications?
In traditional web applications, we can use the browser’s developer tools to examine network requests and responses, it’s the same in the case of SignalR, when WebSockets are used, the request will be sent and the response contains a Upgrade header

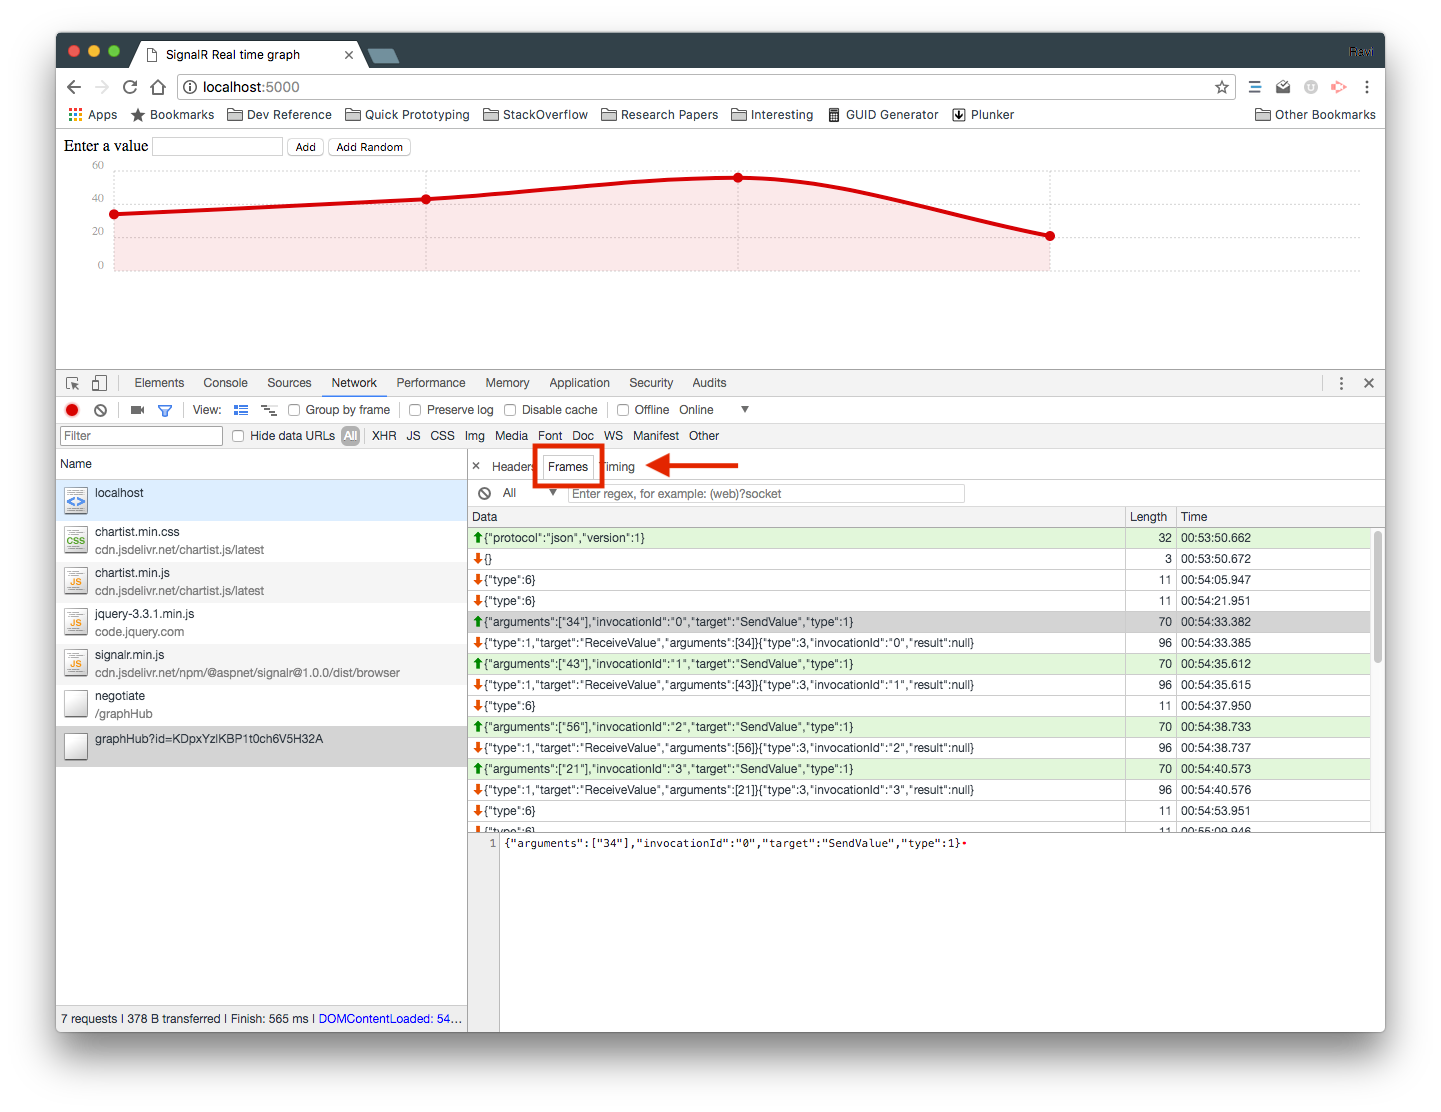
For websocket connections, Chrome developer tools has the frames tab, which can be used to inspect individual frames in a WebSocket connection.
The full source code for this project can be found here.